Why Contour Lines Gather on Steep Ground
Why contour lines gather on steep ground: read the spacing, spot slope changes, and compare route options without mistaking a steep hillside for a cliff.
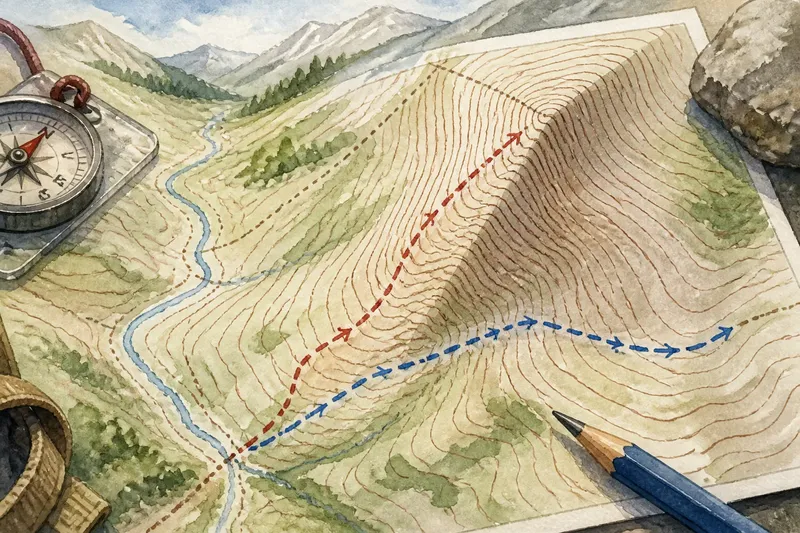
The common mistake with contour lines on steep ground is treating every close pair as a separate wall. That can make a slope look like a jumble of hazards and obscure the simpler clue: elevation changes quickly across a short stretch of horizontal ground.
Read the spacing as a description of the terrain between the lines, not as decoration. The lines become more useful when you check their interval, trace their pattern, and compare it with the route you have in mind.
What does contour spacing tell you?
Each contour line connects places at the same elevation. On a given map, the vertical difference between adjacent contours is fixed; the horizontal distance between them varies. Close spacing means the elevation changes over less ground, indicating a steeper slope. Wider spacing indicates a gentler slope.
Think of stairs on a floor plan. The height of each riser may be the same, but short runs between risers make the climb feel abrupt, while longer runs spread it out. Contour spacing works in a related way: the map’s fixed elevation interval is paired with changing horizontal distance.
Close lines do not, by themselves, tell you whether the ground rises or falls. They show steepness, not absolute elevation. Use labels and the surrounding contour pattern to work out which way the slope goes.
Why check the contour interval first?
The contour interval is the elevation difference between adjacent contour lines. It is usually stated in the map margin or legend. Check it before comparing slopes on different maps: printed gaps alone can mislead when maps use different intervals or scales.
Darker or labeled index contours help keep track of elevation. Start with a labeled line and trace neighboring contours rather than guessing their values. Read any notes about units or elevation references that the map provides.
The interval does not reveal every small change in the ground. A narrow hollow or low knoll may lie between contours without appearing as its own line. A topographic map is a representation of terrain, not a miniature surface model.
How does the pattern change across a hillside?
Compare several contours across the slope, not just one crowded patch. Lines that are wide apart below and close together above suggest the slope steepens higher up; the reverse pattern suggests it eases. A sudden shift in spacing can mark a break in slope.
Contour curves help identify landforms. Nested closed loops may enclose a hill; closed loops with lower values toward the center may indicate a depression, depending on the map’s conventions. In a valley, contours commonly bend into a V or U shape, with the pointed part facing uphill toward the valley’s head. Check elevation labels rather than relying on the shape alone.
Imagine you are planning a traverse across a hillside. The hypothetical map shows broad spacing on the approach, followed by tight contours near a bend. Trace the contours on either side of the bend, then compare a route that crosses the cluster with one that follows broader spacing. The first route crosses a sharper slope; the second may avoid that rise but could encounter a valley or other terrain feature. The map helps identify the tradeoff, but does not settle which route is suitable.
Do close contours mean a cliff?
No. Closely packed contours indicate steep ground, but do not automatically distinguish a cliff from a steep slope. Check the legend for cliff or escarpment symbols. If contours merge or nearly overlap, treat the map’s depiction as unclear rather than deciding from the pattern alone.
Scale and cartographic simplification can affect how abrupt terrain appears on paper. A detailed topographic map or a suitable digital terrain view may clarify the shape, but neither replaces information about footing, vegetation, loose rock, or current conditions. Steep and impassable are not synonyms, and a clean route line is not a promise of easy passage.
How should you compare routes using contours?
Compare the contour pattern along the whole route, not just the number of bends. A route that crosses many close contours changes elevation quickly. A route that follows the contours more nearly may involve less climbing, though it can still meet gullies, cliffs, or other obstacles.
For a climbing route, note where contours spread out and where they bunch together. Also look for saddles, valley bottoms, and spurs, which offer different approaches to a rise. Combine contour information with paths, land cover, water features, and current local information. If a steep or exposed section has serious consequences, choose a route suited to your experience and conditions.
- Check the contour interval in the map margin; if it is clear, use it to interpret vertical changes, and if it is missing or unreadable, avoid comparing apparent gaps with another map until you find its interval.
- Check nearby elevation labels; if they establish which way the ground rises, use them to orient the slope, and if they do not, trace farther to a labeled index contour.
- Check whether spacing stays tight across several lines; if it does, treat the steep section as sustained, and if it widens, look for a gentler stretch while checking for other terrain features.
- Check the contour bends near a valley; if they form a clear V and labels support the direction, use the point to identify uphill, and if the shape is ambiguous, do not infer direction from the bend alone.
- Check the legend for cliff or escarpment symbols; if one appears, account for that mapped feature, and if none appears, do not treat close contours alone as proof of a cliff.
- Check the route against paths, land cover, and water features; if those details support the contour reading, compare the route as a whole, and if they conflict or are unclear, seek more suitable map or local information before relying on the line.
What do readers ask about contour lines on steep ground?
Can wide contour spacing hide a small obstacle?
Yes. A map may omit a small rock step, ditch, or uneven patch, particularly when the feature is too small to show at that scale. Treat wide spacing as a sign of gentler overall relief, not proof that the ground is smooth.
How can you tell which way a valley rises?
Look for contours bending into a V or U shape across the valley, then check elevation labels. The pointed part commonly faces uphill toward the valley’s head; the valley floor descends in the opposite direction.
Why can two maps show different-looking contour spacing?
Maps may use different scales, contour intervals, or levels of detail. Compare their stated interval and scale before judging relative steepness from printed gaps.
When reading contour lines on steep ground, trace each tight cluster outward and notice what happens before and after it. The slope may steepen, ease, or turn into a landform that changes the route choice. Keeping the legend and elevation labels in view helps turn a crowded patch of ink into a more useful picture of the ground.